For anyone considering experimenting with photography there are all sorts of possibilities for trying to capture various different textures. For instance, materials such as wood can often give the photographer with a variety of challenges and photographic examination. Regardless of whether the photographs will be shot in full-color or in the black and white style it is vital to make a well thought out “plan of attack” before beginning to capture the photos. This would incorporate visualizing the kinds of effects and consequences preferred and then working out a a small number of different approaches to shooting such images.
Let’s first consider photographs of wood or wooden objects. Because this is an organic material many people may not consider bringing wood into their studio setup for a photo session, but if we take just a second to contemplate how timber might look we can understand how it would succeed in the “sterile” or cleaner setting of a studio surroundings.
 Timber may be in the form of manufactured items ranging from pencils right through to home furniture to boxes and bowls. It is also naturally occurring in debris and branches too. A single branch or portion of bark will reveal crevices, moss or lichen, and a large variety of special hues and grains.
A photographer might want to take photos of the numerous textures and tones in a piece of driftwood using only the sepia settings on their camera, or they may instead rely on the color features to photograph the texture and different color patterns in something like Tiger Maple. Clearly, this means that a range of approaches is necessary, and choosing the right setup will become imperative to success.
So, how do you know the correct approach to photographing wooden textures? It all comesdown to your intentions. That piece of driftwood could be photographed along the sandy beach where it was found; with the different tones of the wood and the textures of the sand finishing and where you place things in the photo. This same piece of wood, however, might be brought into the studio and set against a concrete black or white background where its swirls, lines, ridges, and different hues will become the whole scene as an alternative.
Irrespective of the type of wooden textures to be photographed and the choice between color or black and white, it is significant to bear in mind that sharpness in texture is the ultimate goal. For this example we will come back to that piece of driftwood and consider looking at it “up close” and also examine it “au natural” with the digital camera.
If a photographer has decided to bring the wood into the photographic studio and get in close to the patterns and textures that have naturally occurred they are going to need to assess the accurate means to do this. Should they shoot with a macro lens or should they use the equivalent method as they would with up-close portrait photography? Generally, it is best to use the zoom lens (such as put to use in a greater part of portrait settings) to get a really good variety of alternatives. If you select macro for such a photo you are going to have to really battle with the lighting development, but the zoom lens will let the photographer keep at a distance and really flood the wood with a large deal of easily controlled lighting. This means that shadows can be designed when needed or they can be totally eliminated by the lighting setup too.
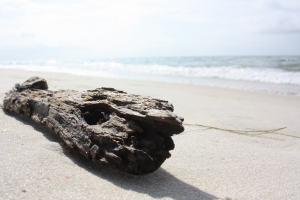
If we head outdoors to capture that piece of driftwood as it lies on the beach, we are going to have to think about the depth and value of its position in the shot. Is it wise that we stand above it and just shoot down into its patterns? Is it more interesting to juxtaposition it against the pale sands, the gray waters, and the pale blue sky? Should it be created in black and white? Some of these queries have more to do with a photographer’s individual preferences than anything else, but for the sake of this conversation we will opt for the color photograph of the driftwood.
 It is going to be an object in deep grey and black tones positioned in a location that is full of paler and softer colors. A photographer must use many of the same procedures for this shot as they would for standard landscape photography. This means they will need to make sure that their foreground and background are in the same focal depth as the subject, and they will need to make sure that the lighting of the setting is balanced. Implementing a polarizing filter can decrease some reflections off the the sea and the sands and keep the colors a bit cooler.
Evidently, these are just straightforward illustrations of how a solitary piece of wood can create an infinite series of photographic opportunities, but it is important for any photographer to keep in mind that their general surroundings are an ideal subject for experimentation.
No comments:
Post a Comment