I have fixed the link below, should be working fine now :)
Special offer, available this week only:
Or :
http://www.digital-photo-secrets.com/tip/focus-1-g4hiebn/
Get free photography ebooks, plus a photography emagazine containing video.
Best wishes,
Amy
Tuesday, January 29, 2013
Monday, January 28, 2013
Thursday, January 24, 2013
Outdoor Portrait Photography Tips

It’s not uncommon for domestic portrait photographer to head outside on a nice day and photograph their model. As a photographer I find that the studio can make people a bit nervous. The large lights and camera lens can make for a nervous experience. For shy people wanting their photograph taken, a studio isn’t always ideal.
Light is very important even in outdoor portrait photography. You must take your flash with you to fill in any shadows that appear. A reflector is a handy tool too. You can place the reflector under the persons face to shoot a very abstract shot, or, to simply get rid of shadows under the nose and chin.
Recently I did a portrait shoot outside. It was of a young lady who wanted photos for her portfolio. She was hoping to break into modelling. After some ideas back and forth it was decided that going to the park was an ideal way to do the shoot.
Lenses for portrait photography
Firstly, one of the most important features of successful outdoor portrait photography is the lens you use. Using the right aperture, focal length and depth of field are crucial factors to an outdoor portrait shoot.
A fast lens is the preferred lens by professional portrait photographers. What is a fast lens? A fast lens is a lens that has a very large maximum aperture. This may be anywhere between 1.8 and 2.8. This means that you can let a lot of light in and use a fast shutter.
Creative portrait photography ideas
You can develop a multitude of creative portrait photography ideas simply by practicing. Practicing gives you something so incredibly valuable: experience. Once you begin to gain more experience in outdoor portraits you will see how outdoor light and flash work, how shadows interact on peoples faces and most importantly how you can do it better next time.

Many of my most creative ideas come from receiving a formal education, but also, from watching the way light works. Light can give you some great ideas about where to position a person, how to angle yourself to get the best portraits.
Outdoor portrait photography poses
It depends on whether your model is male or female as to how you ask someone to pose for you. There are different stances that a man will take to appear more masculine. There are very different poses a woman will take so she looks more feminine. Female models look best when the lines of her body are accentuated. This involves turning on an angle, tilting the head and using the focus on the eyes. You can employ the use of a foot change to accentuate a postural change.

High key portrait photography
What does high key actually mean? Well if you go by the technical definition it is all about reducing the lighting ratio present in the scene. What this means, in English, is that the lighting is overexposed with just the main details in focus. This is great fun and a terrific way to create interesting portraits.
Can you use high key photography outdoors? Most definitely. As long as you have a strong light source on one side of the persons face, you can use the flash on the other side. Make sure you lock your focus on the eyes first so detail is maintained on the eyes.
(I will post some high key photos on the blog very soon, just as soon as I receive the model release form.)
Remember that shooting outdoor portrait photography is a great opportunity to have an interesting background. A park, beach or city street scene can enhance the story of your photo significantly.
Thursday, January 10, 2013
White Balance Explained
White Balance Explained
White balance is the way we gauge and establish the colour of an image. White balance means the "all over" colour tone itself. Colour tone is the broad colour that’s spread right over the entire picture. When you take a photo in the house, with no direct flash, you will sometimes notice a blue colour tone spread over the photo. This is your white balance.
Getting correct white balance is one of the most important factors of photography. When you have the correct white balance you will see that colours look true to life.. Skin tones look real also, instead of looking fake or too yellow. Correct white balance becomes a really central element of portrait photography for this reason.
How do we find the most correct white balance we can? First we need to comprehend that there is no one set white balance for every situation. Each white balance feature on your camera, like Tungsten for instance, is not correct for every occasion. Tungsten makes your photos look quite blue if they are photographed in normal light. When you photograph a subject that is under yellow lights it can make your subject appear too yellow. Photographing in Tungsten will eliminate the influence of yellow and help take your photograph back to a usual colour tone again.
Automatic white balance is the general selection for most newbie photography enthusiasts. This is fine as long as you fine-tune your white balance in Photoshop or Lightroom afterward. You will discover that if you shoot in auto white balance on a regular basis, your photography just won’t look very nice. You might find that your pictures just don’t replicate the proper colours that you see with your naked eye.
Shade and cloudy white balance are two favourites if you want to “warm up” your shots. They present a warm colour cast such as yellow, to overlay onto your pictures. This can be a great shooting feature particularly at twilight or sunrise. Shade and cloudy white balance can highlight the vibrancy in your warmer colours. This allows sunsets and sunrises to appear energetic. This is a nice option for sunrises.
Shade and cloudy white balance settings are not suitable for photographing people. The last thing we wish for in our wedding and portrait images is a yellow hue over a photo of the bride and groom. Tungsten is not correct either. We certainly do not need the bride and groom appearing too blue. Auto white balance doesn’t always succeed for portraits because of the way the digital camera is made. The digital camera you own does not naturally comprehend what colours should look like. When you choose auto white balance you give the digital camera free reign to do as it wants. This does not work well when you want true to life vibrancy.
True to life colour is dependent on “training” the camera to recognize colour. This is where custom white balance has advantages. When you level a grey card at the front of the camera and set your custom white balance to it, it then understands what’s happening. It then sets all colour either side of that grey tone. It’s quite difficult how it does this. As a photographer all you need to understand is that colour needs to be true, and a grey card is the means to do it.
Basically modify your white balance mode to custom. Then photograph a grey card with the correct exposure. Then it’s important to “set” the custom white balance from that photo. You will notice that for that precise photo session, your colours come to life. You’ll be able to see finer colours like light pink, magenta and lemon yellow as they really are.
White balance is one of the primary things to producing a striking photograph. If you follow these easy actions, no longer will you feel baffled about why you are not getting correct colour. It will truly transform the way you look at photography forever.

This colours you see are enhanced using a grey card and custom white balance. I've increased the vibrancy in Photoshop a little, but mainly kept everything looking natural.
To learn more just come and see me at www.DigitalPhotographySuccess.com
White balance is the way we gauge and establish the colour of an image. White balance means the "all over" colour tone itself. Colour tone is the broad colour that’s spread right over the entire picture. When you take a photo in the house, with no direct flash, you will sometimes notice a blue colour tone spread over the photo. This is your white balance.
Getting correct white balance is one of the most important factors of photography. When you have the correct white balance you will see that colours look true to life.. Skin tones look real also, instead of looking fake or too yellow. Correct white balance becomes a really central element of portrait photography for this reason.
How do we find the most correct white balance we can? First we need to comprehend that there is no one set white balance for every situation. Each white balance feature on your camera, like Tungsten for instance, is not correct for every occasion. Tungsten makes your photos look quite blue if they are photographed in normal light. When you photograph a subject that is under yellow lights it can make your subject appear too yellow. Photographing in Tungsten will eliminate the influence of yellow and help take your photograph back to a usual colour tone again.
Automatic white balance is the general selection for most newbie photography enthusiasts. This is fine as long as you fine-tune your white balance in Photoshop or Lightroom afterward. You will discover that if you shoot in auto white balance on a regular basis, your photography just won’t look very nice. You might find that your pictures just don’t replicate the proper colours that you see with your naked eye.
Shade and cloudy white balance are two favourites if you want to “warm up” your shots. They present a warm colour cast such as yellow, to overlay onto your pictures. This can be a great shooting feature particularly at twilight or sunrise. Shade and cloudy white balance can highlight the vibrancy in your warmer colours. This allows sunsets and sunrises to appear energetic. This is a nice option for sunrises.
Shade and cloudy white balance settings are not suitable for photographing people. The last thing we wish for in our wedding and portrait images is a yellow hue over a photo of the bride and groom. Tungsten is not correct either. We certainly do not need the bride and groom appearing too blue. Auto white balance doesn’t always succeed for portraits because of the way the digital camera is made. The digital camera you own does not naturally comprehend what colours should look like. When you choose auto white balance you give the digital camera free reign to do as it wants. This does not work well when you want true to life vibrancy.
True to life colour is dependent on “training” the camera to recognize colour. This is where custom white balance has advantages. When you level a grey card at the front of the camera and set your custom white balance to it, it then understands what’s happening. It then sets all colour either side of that grey tone. It’s quite difficult how it does this. As a photographer all you need to understand is that colour needs to be true, and a grey card is the means to do it.
Basically modify your white balance mode to custom. Then photograph a grey card with the correct exposure. Then it’s important to “set” the custom white balance from that photo. You will notice that for that precise photo session, your colours come to life. You’ll be able to see finer colours like light pink, magenta and lemon yellow as they really are.
White balance is one of the primary things to producing a striking photograph. If you follow these easy actions, no longer will you feel baffled about why you are not getting correct colour. It will truly transform the way you look at photography forever.
This colours you see are enhanced using a grey card and custom white balance. I've increased the vibrancy in Photoshop a little, but mainly kept everything looking natural.
To learn more just come and see me at www.DigitalPhotographySuccess.com
Tuesday, January 08, 2013
Monday, January 07, 2013
How to Photograph Texture and Detail in Nature Photography
How to Photograph Texture and Detail in Nature and Landscape Photography
For anyone considering experimenting with photography there are all sorts of possibilities for trying to capture various different textures. For instance, materials such as wood can often give the photographer with a variety of challenges and photographic examination. Regardless of whether the photographs will be shot in full-color or in the black and white style it is vital to make a well thought out “plan of attack” before beginning to capture the photos. This would incorporate visualizing the kinds of effects and consequences preferred and then working out a a small number of different approaches to shooting such images.
Let’s first consider photographs of wood or wooden objects. Because this is an organic material many people may not consider bringing wood into their studio setup for a photo session, but if we take just a second to contemplate how timber might look we can understand how it would succeed in the “sterile” or cleaner setting of a studio surroundings.
 Timber may be in the form of manufactured items ranging from pencils right through to home furniture to boxes and bowls. It is also naturally occurring in debris and branches too. A single branch or portion of bark will reveal crevices, moss or lichen, and a large variety of special hues and grains.
A photographer might want to take photos of the numerous textures and tones in a piece of driftwood using only the sepia settings on their camera, or they may instead rely on the color features to photograph the texture and different color patterns in something like Tiger Maple. Clearly, this means that a range of approaches is necessary, and choosing the right setup will become imperative to success.
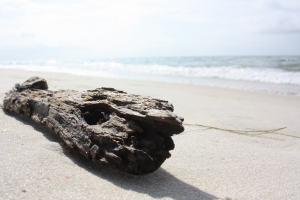
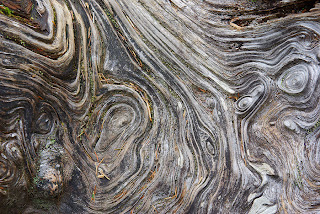
So, how do you know the correct approach to photographing wooden textures? It all comesdown to your intentions. That piece of driftwood could be photographed along the sandy beach where it was found; with the different tones of the wood and the textures of the sand finishing and where you place things in the photo. This same piece of wood, however, might be brought into the studio and set against a concrete black or white background where its swirls, lines, ridges, and different hues will become the whole scene as an alternative.
Irrespective of the type of wooden textures to be photographed and the choice between color or black and white, it is significant to bear in mind that sharpness in texture is the ultimate goal. For this example we will come back to that piece of driftwood and consider looking at it “up close” and also examine it “au natural” with the digital camera.
If a photographer has decided to bring the wood into the photographic studio and get in close to the patterns and textures that have naturally occurred they are going to need to assess the accurate means to do this. Should they shoot with a macro lens or should they use the equivalent method as they would with up-close portrait photography? Generally, it is best to use the zoom lens (such as put to use in a greater part of portrait settings) to get a really good variety of alternatives. If you select macro for such a photo you are going to have to really battle with the lighting development, but the zoom lens will let the photographer keep at a distance and really flood the wood with a large deal of easily controlled lighting. This means that shadows can be designed when needed or they can be totally eliminated by the lighting setup too.
If we head outdoors to capture that piece of driftwood as it lies on the beach, we are going to have to think about the depth and value of its position in the shot. Is it wise that we stand above it and just shoot down into its patterns? Is it more interesting to juxtaposition it against the pale sands, the gray waters, and the pale blue sky? Should it be created in black and white? Some of these queries have more to do with a photographer’s individual preferences than anything else, but for the sake of this conversation we will opt for the color photograph of the driftwood.
 It is going to be an object in deep grey and black tones positioned in a location that is full of paler and softer colors. A photographer must use many of the same procedures for this shot as they would for standard landscape photography. This means they will need to make sure that their foreground and background are in the same focal depth as the subject, and they will need to make sure that the lighting of the setting is balanced. Implementing a polarizing filter can decrease some reflections off the the sea and the sands and keep the colors a bit cooler.
Evidently, these are just straightforward illustrations of how a solitary piece of wood can create an infinite series of photographic opportunities, but it is important for any photographer to keep in mind that their general surroundings are an ideal subject for experimentation.
For anyone considering experimenting with photography there are all sorts of possibilities for trying to capture various different textures. For instance, materials such as wood can often give the photographer with a variety of challenges and photographic examination. Regardless of whether the photographs will be shot in full-color or in the black and white style it is vital to make a well thought out “plan of attack” before beginning to capture the photos. This would incorporate visualizing the kinds of effects and consequences preferred and then working out a a small number of different approaches to shooting such images.
Let’s first consider photographs of wood or wooden objects. Because this is an organic material many people may not consider bringing wood into their studio setup for a photo session, but if we take just a second to contemplate how timber might look we can understand how it would succeed in the “sterile” or cleaner setting of a studio surroundings.
Timber may be in the form of manufactured items ranging from pencils right through to home furniture to boxes and bowls. It is also naturally occurring in debris and branches too. A single branch or portion of bark will reveal crevices, moss or lichen, and a large variety of special hues and grains.A photographer might want to take photos of the numerous textures and tones in a piece of driftwood using only the sepia settings on their camera, or they may instead rely on the color features to photograph the texture and different color patterns in something like Tiger Maple. Clearly, this means that a range of approaches is necessary, and choosing the right setup will become imperative to success.
So, how do you know the correct approach to photographing wooden textures? It all comesdown to your intentions. That piece of driftwood could be photographed along the sandy beach where it was found; with the different tones of the wood and the textures of the sand finishing and where you place things in the photo. This same piece of wood, however, might be brought into the studio and set against a concrete black or white background where its swirls, lines, ridges, and different hues will become the whole scene as an alternative.
Irrespective of the type of wooden textures to be photographed and the choice between color or black and white, it is significant to bear in mind that sharpness in texture is the ultimate goal. For this example we will come back to that piece of driftwood and consider looking at it “up close” and also examine it “au natural” with the digital camera.
If a photographer has decided to bring the wood into the photographic studio and get in close to the patterns and textures that have naturally occurred they are going to need to assess the accurate means to do this. Should they shoot with a macro lens or should they use the equivalent method as they would with up-close portrait photography? Generally, it is best to use the zoom lens (such as put to use in a greater part of portrait settings) to get a really good variety of alternatives. If you select macro for such a photo you are going to have to really battle with the lighting development, but the zoom lens will let the photographer keep at a distance and really flood the wood with a large deal of easily controlled lighting. This means that shadows can be designed when needed or they can be totally eliminated by the lighting setup too.
If we head outdoors to capture that piece of driftwood as it lies on the beach, we are going to have to think about the depth and value of its position in the shot. Is it wise that we stand above it and just shoot down into its patterns? Is it more interesting to juxtaposition it against the pale sands, the gray waters, and the pale blue sky? Should it be created in black and white? Some of these queries have more to do with a photographer’s individual preferences than anything else, but for the sake of this conversation we will opt for the color photograph of the driftwood.
 It is going to be an object in deep grey and black tones positioned in a location that is full of paler and softer colors. A photographer must use many of the same procedures for this shot as they would for standard landscape photography. This means they will need to make sure that their foreground and background are in the same focal depth as the subject, and they will need to make sure that the lighting of the setting is balanced. Implementing a polarizing filter can decrease some reflections off the the sea and the sands and keep the colors a bit cooler.
Evidently, these are just straightforward illustrations of how a solitary piece of wood can create an infinite series of photographic opportunities, but it is important for any photographer to keep in mind that their general surroundings are an ideal subject for experimentation.
Subscribe to:
Posts (Atom)