Recently I was asked by a subscriber of mine in New York State as to how he could improve his daylight digital photos to create a more even light across his digital photos. I suggested that in digital photography there were many tools such as a polariser, a Neutral Density Filter and some other fancy tools.
He said “I mean after the pictures has been taken. I really want my digital photography to turn out a lot better than what I am getting.”
What he was talking about was a digital photography method called post-editing. Post means “after” and editing…well you know what that means. And in digital photography as opposed to photography you can edit your photos so much easily than traditional film photography.
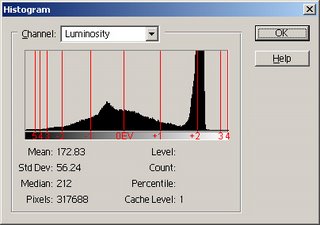
What I advised Grant was that he had a few options. He could try editing his digital photography images by increasing or decreasing the light values via the Histogram. The Histogram is probably one of your best friends in digital photography that you could ask for as far as post editing goes. In a nutshell you simply open up your digital photos in Adobe Photoshop. Then once you have done that you click on “image” up the top menu bar. Once the menu box has come up you then click on “adjust” and then “levels” and up comes the Histogram.
The Histogram will display the light values from the brightest part of your digital photo to the darkest parts. It displays this light & dark information in the form of a graph. It looks something you’d see on the stock market to measure the trends of stock over a certain period of time. You might see thin lines or a block of black shadow with peaks and troughs.
The right side of the reading of the Histogram represents the brighter colours. The left side represents the darker colours. You can pull the brightness down to create a more even light over the picture if you have several overexposed parts of your digital photo. Or alternatively if there are too many underexposed parts of your digital photo you can increase the brightness.
You can increase the brightness significantly by pulling the slider to the left. And you can do the opposite with the sliders to the right. By pulling the far left or far right slider, you’ll be increasing the contrast. By pulling the middle slider either side, you will have increased brightness or darkness but not so much contrast. You’ll see that this is an incredibly simple yet powerful post editing digital photography technique.
If you have a digital photo that is underexposed with the handy Histogram you can simply change the ‘luminance output levels’. As a result you’ll create a more evenly lit digital photo.
Happy shooting!
Amy Renfrey
1 comment:
Please continue to blog. This is excellent info you're putting out! Thank you for sharing your knowledge!
Post a Comment