A Site Where Digital Photographic Enthusiasts Can Come And Learn Ways To Improve Their Photographic And Artistic Skills, Share Pictures And Photo Experiences. People With A Clean Sense Of Humour Very Welcome.
Thursday, February 22, 2007
How To Get Better Digital Photography Lighting- Introducing The Histogram
Recently I was asked by a subscriber of mine in New York State as to how he could improve his daylight digital photos to create a more even light across his digital photos. I suggested that in digital photography there were many tools such as a polariser, a Neutral Density Filter and some other fancy tools.
He said “I mean after the pictures has been taken. I really want my digital photography to turn out a lot better than what I am getting.”
What he was talking about was a digital photography method called post-editing. Post means “after” and editing…well you know what that means. And in digital photography as opposed to photography you can edit your photos so much easily than traditional film photography.
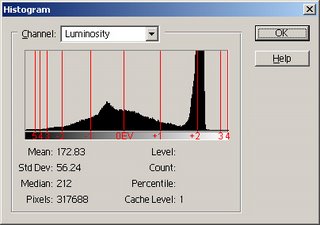
What I advised Grant was that he had a few options. He could try editing his digital photography images by increasing or decreasing the light values via the Histogram. The Histogram is probably one of your best friends in digital photography that you could ask for as far as post editing goes. In a nutshell you simply open up your digital photos in Adobe Photoshop. Then once you have done that you click on “image” up the top menu bar. Once the menu box has come up you then click on “adjust” and then “levels” and up comes the Histogram.
The Histogram will display the light values from the brightest part of your digital photo to the darkest parts. It displays this light & dark information in the form of a graph. It looks something you’d see on the stock market to measure the trends of stock over a certain period of time. You might see thin lines or a block of black shadow with peaks and troughs.
The right side of the reading of the Histogram represents the brighter colours. The left side represents the darker colours. You can pull the brightness down to create a more even light over the picture if you have several overexposed parts of your digital photo. Or alternatively if there are too many underexposed parts of your digital photo you can increase the brightness.
You can increase the brightness significantly by pulling the slider to the left. And you can do the opposite with the sliders to the right. By pulling the far left or far right slider, you’ll be increasing the contrast. By pulling the middle slider either side, you will have increased brightness or darkness but not so much contrast. You’ll see that this is an incredibly simple yet powerful post editing digital photography technique.
If you have a digital photo that is underexposed with the handy Histogram you can simply change the ‘luminance output levels’. As a result you’ll create a more evenly lit digital photo.
Happy shooting!
Amy Renfrey
Sunday, February 11, 2007
High Dynamic Range In Digital Photography
If you have ever wanted to improve your digital photography then you may want to consider learning about
In the digital photography world
You will notice that after understanding
You may find that when photographing things outdoors in your digital photography such as landscapes, beach and snowscapes etc, you have a lot of contrasting highlights that slow your progress down. To overcome sections of high contrast you can use ND filters, a polariser, exposure bracketing, post editing in Photoshop etc, etc, the list goes on what you can do in digital photography but really, to get a more accurate exposure working with your
You can get a good idea of digital photography Dynamic when you go outside and look at the light. For example
Let’s take my Sony digital camera to use as an example. It has 6 stops of
In the wonderful Adobe Photoshop I may decide to take a handful of exposures to cover the complete dynamic range. In each photo exposure I keep the aperture the same (changing aperture changes the depth of field). My aim here is to create different photos making sure that in each I cover the available brightness levels in the landscape.
Picture ©A. Syed
Submit article | Digital Camera Resource
Saturday, February 03, 2007
Digital Photography Multiple Exposures
Digital Photography is one of the most creative hobbies you can partake in. And sometimes we reach a stage of evolution in our digital photography whereby we want another challenge, or another way to express our creativity. And, undoubtedly, along your digital photography path, you'll come across a technique called "Multiple Exposures."
Multiple Exposures is a technique in digital photography whereby you can create a really ingenious effect. You can add colour, darken images, shade whiter areas, change shapes via light alterations etc. It’s really a fun digital photography technique and can give you much scope. For example in digital photography sometimes you will find that noise can interfere with picture quality and with this technique you can tone down the effect of noise.
An example of multiple exposures is taking two digital photography images and each of them to be exposed by one F stop. For example, let’s say that the first digital photos 'correct' exposure is F 16. You can take the first photo at F11 and the second one at F 8.
However not all digital cameras offer the ability to create multiple exposures. The digital cameras that can offer multiple exposures are dslr's such as Fujifilm FinePix S1 Pro and S2 Pro. Can you create multiple exposures without having more expense of a camera in your digital photography? Good news; the answer is yes.
This is where Photoshop comes in. By adjusting a few things in Photoshop, your digital photography images can become more and more interesting. In Photoshop you can actually create the most beautiful multiple exposures.
One of the first things to do to try this digital photography technique is to make sure you have the right exposure compensation. I won't go into complicated scientific jargon (light is pretty complicated at a base scientific technique) but what I will say is it’s a precision in digital photography metering that mastery is required. Instead of worrying about this in great detail, just know that in order to get the correct exposure value you may need to apply bracketing to your digital photography images. You can use your manual setting along with the meter to get some images that are a little darker than you would normally have, just for the purpose of this technique.
With multiple exposures it’s not necessary to keep every single photo you take. If you want to give an image more of a certain colour or brightness you can simply bracket accordingly. You can think of this as gaining momentum. You will find that after a while, you look at new eyes towards your digital photography.
Next week: How To Create Digital Photography Multiple Exposures In Photoshop
If you want to learn how to take sensational digital photography like the pro's do just go to www.DigitalPhotographySuccess.com