Saturday, August 19, 2006

How To Take Perfect “People Pictures” In Digital Photography


One of the things people ask me most about digital photography is how to take perfect “people pictures.” Digital photography is great for people because you can simply delete the ones you don’t like, and show them, on the spot, what the digital photo looks like.
In any digital photography session, whether it be portrait photography or photography at a birthday party it takes prior knowledge to getting “perfect people” digital photos.
So here are the digital photography secrets to this type of photography.

People Photography Secret number 1:

Horizontal vs. vertical

Most people who do digital photography of people hold the digital camera horizontal. Not sure why this is; most likely because the digital camera is built that way, but really you can do well with holding the camera vertical as well. Horizontal digital photos of people are ok, but work best when taking a group photo rather than a single photo of someone. A vertical angle for your digital people photo can give you a great composition for close up and it tells you a lot more about that person that a horizontal will. Horizontal angles in digital photography of single people tends to increase the amount of potential clutter and irrelevant objects in the frame.

People Photography Secret Number 2

Where to put your people in the frame

In digital photography, pictures of people work best by creating some interesting composition. Don’t put your person in the center of the frame just because everyone else does their digital photography that way; be unique and creative and you’ll get a much be result. And good digital photography is all about capturing that special moment of someone to last and reflect something positive about that person, right?

People Photography Secret Number 3

Go Candid.

Personally, in my experience as someone who does digital photography for a living, I can tell you that candid digital photographs work so much better then staid photos. It’s so much better to capture someone just as they laugh at a funny joke, or see their friend for the first time in a while, or even talking quietly to others, it so much more interesting and creates a positive photo of someone than a shot of them looking into the camera with a posed shot; hey anyone can do that. But do take that digital photo with them laughing and not knowing they’re being photographed captures a side of them that not everyone sees. It’ll show them in good spirits and create a positive image for all those who see that digital photo from now on. Get creative with people photography; try black and white and sepia. And even try taking the digital photo of them doing something they love, like playing an instrument for example.

Good luck!
Amy Renfrey

If you are totally serious and really want to learn proper people photography just go to www.digitalphotographysuccess.com right now for ways to bring your people pictures to life...

EzineArticles.com Platinum Author


This photo is copyrighted to Amy Renfrey.

How To Photograph Landscapes With Your Digital Camera

If you’ve ever wanted to do landscape digital photography then here is some good news. You don’t need powerful digital photography equipment, but what you do need is a good lens.

Sorry to say but a lot of (I didn’t say all) digital cameras can’t take clear and “big” landscape photos because they don’t have the lens that enables them to do it. Digital photography has come along way in recent years and is racing up to traditional camera quality. Due to this fact landscape digital photography still needs to be done with a good lense.

So what is a good lens for landscape digital photography? A wide angle is a good place to start. Like a lot of things in digital photography this rule is not set in stone like the ten commandments, but it will help you a lot if you have a lens that is able to take mountain and nature scenes with a good view.

Think of a lens as a pair of glasses. The digital camera has the eye and the eye needs glasses. Okay, bear with me here….

The eye needs special lenses to see things from certain angles. It needs a pair of binoculars to see far away distances up close (telephoto lens), a magnifying glass if it wants to see detail up very close (macro lens) and it needs to see a ‘wide’ if it wants to see a scene clearly (wide angle lens.)

Okay now I know you are not a silly person and you can understand more technical things that that! I am just meaning that if you want good, clear detail in your landscape digital photography then you need to assist your digital camera to do it. And a wide angle is exactly what it says; it gives you a wider angle to shoot mountain ranges, landscapes, seascapes and even astrophotography. (The stars in the night sky.)

It’s easy to get landscape digital photos, but without the right lens its not easy to get good, sharp and clear digital landscape photos. If you won’t have the right lens then your landscapes will be flat lines with no depth, and you’ll be frustrated. I know, because this happened to me. Until I understood that your digital camera acts like the human eye and sometimes needs a little help for it to “see” what you want it to see.

If you are not sure if your digital camera can even take good landscape photos, then try it out. Get yourself to a mountain range or even cityscape and take a few different angles. If you have a camera that has an adaptable lens then you will be thankful for ever! If not, don’t despair, you can always hire dlsr’s from camera stores for a pretty reasonable price. It will be entirely worth it for that brilliant, clear, sharp detailed landscape photo you can hang on your wall for the rest of your life.

Good luck!

Amy Renfrey

If you are serious about landscape photography and want to know how to take suberb, clear digital images of your beautiful landscape then just go to www.beautifuloutdoorphotography.com

www.digitalphotographysuccess.com

Photo copyrighted by Lyndie Jeffrey. Landscape Photographer of the year winner 2006.


EzineArticles.com Platinum Author

Wednesday, August 09, 2006

Digital Photography On Vacation

Going on holidays or vacation to get away provides one of the best digital photography opportunities that must not be missed. Most people take the usual digital photography “snaps” without really looking an examining their environments first.

The normal holiday digital photographs are taken with hard light over exposing parts of the picture, and the digital image is always the same. One or two people standing near a monument with the usual holiday clothing on…it’s the same ting over and over again.

If you want to get interesting digital photography opportunities then firstly the thing to do is not do what everyone else does! So let’s looks at ways you can make you digital vacation photos interesting so that you can use them to hang on the wall or give away as postcards when you get back, or greeting cards. Ahh, what the wonderful world of digital photography can do for the soul!

Firstly the get your digital photography really interesting and stimulating when going on holiday is to research as much as you can about the area you are going to, and, the season you are going in, and what the temperature is likely to be. This is called digital photography preparation; not just holiday preparation.

Discover what things you will be likely to visit. Are you going to a fairly established area, such as old churches that have been around for centuries and you are aiming to get your digital photography experience reflecting the beauty and the art work in these old buildings?

Or perhaps you are having an action holiday with hot summer days, beaches, hotels, lying by the pool….in that case then your digital photography will be a completely different experience. Your digital photography needs will be very different and require different things.

If you perhaps want to do a bit of both; churches in Rome then Hawaii on the flight back then you have an even more interesting set of digital photography requirements. Most digital photography professionals may take two cameras, one digital camera for one scene or situation and a traditional camera with film for another situation. But being an enthusiast, you don’t have to go to that length; there are some things you can do.

The reason I say to investigate further about what it is you really want to see when you are on your vacation is to see what kind of light you will be working with. If you are going to see some beautiful European churches in winter time then the light will be very different from the light on a beach in summer time in Hawaii. Digital photography is the type of activity that requires you think about what you are doing first. Always think about your digital photography in this way because light can be very different in other places and especially if you are going to a different season.


Good luck!

Amy Renfrey

www.digitalphotographysuccess.com


EzineArticles.com Platinum Author

Tuesday, July 25, 2006

The Secret To Digital Photography Part 3

Okay now I know you are wondering what the third secret to digital photography is....

I think I'll wait till next week to tell you....just kidding! I'll tell you now.

It’s technical ability. Is that all? You say. Well my friend, learning what things mean what on the camera feels like it can take a lifetime, so here are some simple ways to help you learn to refine your digital photography skills. Once you have the artistic side of digital photography covered, you can then fine tune the artist in you and work that camera.

Just before I explain the digital camera in more details, firstly I want to say this about digital photography; you need to learn the technical aspects of the digital camera so that you can become the master and controller, not the other way around. When you first start out in digital photography it feels like you are at the whim of the digital camera and it controls your digital photography. Once you start learning what does what on the camera, you'll find that you become the master and controller.

Lets look at the common terms in digital photography and simplify them into plain English. (God knows you will be forever looking at the camera manual thinking "what the heck does that mean?" So read this instead...)

Hey the only thing I knew when I started digital photography 6 years ago was what a lens cap was so if you don't know the basic stuff please don't feel bad. That's why I am here; to help you.

Firstly to be good at digital photography you must first understand how the camera works. Your digital camera is a brilliant device and is very much like the human eye. There is an "eye lid" and a "pupil". The eye lid blinks open and shut- this is how the shutter speed works. The pupil- how far the lens opens to let light in is the aperture. The flash works as a torch light. It is a direct source of light to provide more light where the camera needs it. You can use this anytime of day or night.

So with that basic analogy we can define some meanings. Don't get too stressed about trying to remember these things, just remember the basics of how the camera works to begin with, then eventually these things will become more and more attainable to you.

Exposure: This means, basically, the total amount of light falling onto the sensor in your digital camera. The way this is "measured" is by calling the level a "value." Or in shorter terms for digital photography its called an "E/V". The more E/V registered on your digital camera the more light is getting in. Think of it as a higher E/V means a higher concentration of light going in the camera.

On my Sony brick...sorry I mean my old Sony Cyber shot, if I take a sunset shot and need to have more light in the picture then I'll increase the E/V to +2.0. If it is a sunny day, like a bright summers day and I want to stop the picture from being overexposed and reduce the amount of light coming in to the digital camera, I'll reduce the E/V to -0.3 for example.

These numbers simply pertain to my camera, so don't worry too much about them, but just understand the principle. The lesser the E/V number the less light. In effect you are making the pupil smaller so less light comes in and vice versa.

Aperture: The aperture means the actual size of the opening of the lens. It's a lot like exposure but relates to size more than anything. Think of this as the opening itself and controls how much light gets into the cameras sensor.

Shutter speed: This is the eyelid, if you like. It’s the speed in which the eye lid blinks open and shut. A fast "blink" means you can freeze time and capture fast action shots such as a person running without blur, or cars racing without blur. So really it is the measurement of how long the shutter is open when the digital photo is taken.

You will see sometimes 1/125th or 125 for example. This means that the shutter is open for 125th of a second. The higher the amount of time, the longer the shutter stays open. So in digital photography picture-taking terms if you want a blurry effect then leave the shutter open for a second to ten seconds and see the difference in effect. The quicker the shutter is open, the more you will capture, such as race cars or peoples fast action suspended in time without blur.

Lag: I just know this as "pain in the butt". It’s the time delay between when you press the shutter button and when the camera actually takes the photo. It's been the problem with digital photography until recent years when the dlsr cameras have almost reduced this altogether. The higher priced cameras have very little lag.

Flash Fill: This is a saviour for day photos where there is over exposed and underexposed areas in a digital photo- in the same photo. Imagine a bright sunny day and you take a photo of someone on the beach with the sun behind them. The digital camera will actually "see" the bright sky and keep that in focus and reduce the light on the persons face. To combat this you can use the flash to compensate for the camera "forgetting" about the persons face. Its the best thing since sliced bread. This is how you get shots of people blowing out birthday candles and are able to see their faces clearly.

Rule Of Thirds: When I first started digital photography I thought ; "Gee I mustn't take that picture unless I abide by this principle." Well that didn't last long. Now I don't even think about it. But this principle in photography should be called a guideline, not a rule. However when you are just starting digital photography its great to learn- it really helps you.

This website describes it better than I can.
(www.digitalpostproduction.com/Htm/Features/
DigitalVideoGlossary.htm)

"This rule takes our rectangular shape and divides it into thirds. The key elements or objects in a composition should fall on one of these thirds lines. The one point on our photograph where the viewers' eye comes to rest should fall on one of these lines where both a horizontal and a vertical line come to rest."

Okay so that is about it for now. Just focus on those things in your digital photography and the rest will come with time and lots of practice. The best way to become good at digital photography is to let your heart take over, just relax and clear your mind and allow the artist within you to surface and then things will fall into place.

There is more in "Digital Photography Success" of course so if you want to have a look and learn more about how to become skilled in this highly addictive hobby then go to www.digitalphotographysuccess.com

My best to you,
Amy Renfrey

Next week I'll discuss the tricks and tips to getting clarity in your digital photography when you have a short depth of feild. :)


EzineArticles.com Platinum Author

Monday, July 24, 2006

www.beautifuloutdoorphotography.com

To discover all the professional digital photography landscape secrets, click here.

The Secret To Digital Photography Part 2

Last week we discussed light as being the first secret to successful digital photography. This week we are going to examine the second secret to digital photography, and that my friend, is composition.

Composition in your digital photography, if you like, is really your shapes, lines and forms all working together in your digital photo. Its not just these working together, its really all your shapes working together, complimenting each other to create a visual balance. So what do I mean by this?

Example:

A seascape photo. The reason why this digital photo works is because the lines of the clouds work to compliment the horizon line of the ocean. The direction of the clouds creates lines and forms. These forms in this digital photo work together to create a balance of symmetrical shape with the line of the ocean. See how these things work to create symmetrical composition?

The key also is to keep your composition simple. Don't overcrowd your digital photo with unnecessary and irrelevant forms and images that have nothing to do with the story you are creating with your digital photography.

Its this simplicity of lines and forms that create good composition. You will notice that the best photos are simple. There is no clutter, no distraction, no irrelevance and everything works together. The outer parts of the digital photo all lead to a single point of focus- and this is GOOD photography.

So whenever you embark on digital photography just remember; make sure the light is evenly spread across your digital photo and make sure you keep the lines and forms really simple. The less clutter the better.

I took this digital photo to show you that you can create good photos using a basic digital camera if you apply the 3 secrets to digital photography. It’s just a simple one, but just because you don't ideally have the latest dlsr camera doesn't mean your shots can't turn out.

Now, on to secret number 3.....

Good luck.

Amy Renfrey

www.digitalphotographysuccess.com
www.beautifuloutdoorphotography.com

This picture is copyrighted to Amy Renfrey.


EzineArticles.com Platinum Author

Tuesday, July 18, 2006

The Secret To Digital Photography Part 1


It’s very exciting starting digital photography. You might even invest in your first digital camera; it’s really a world unknown until you learn some digital photography tips and perhaps even go on a few day outings and take several digital photos.


But really, what does it take to get your digital photography from frustrating "why-won't-it-turn-out" to "wow-it-looks-like-a-professional-digital-photo" standard?

That's easy; there are three secrets to digital photography that you must know or you might be frustrated for a long time. So here is the first secret:

Digital photography secret 1; Light

It sounds pretty simple doesn't it, almost too simple to be a 'secret'. But I tell you its not. If you understand that in digital photography your light is one of the top three elements to success then you will be on your way to creating digital photos to be proud of.

Always aim for even light over your digital photo image. If you have the whole scene and the whole subject well light so there are no hard shadows making it difficult to focus on then you are on your way to success.

You may have heard that cloudy days are a key element to a digital photography- my response to this is "most definitely but do you know why?" The whole issue of light in digital photography is getting even light over the scene as I just mentioned. You see sun light during the day can either work as your best friend or a complete enemy. It can create huge patches and lines of hard light that create and cast shadow over your scene or subject making it impossible to create a good digital photo.

You can have sensational digital photography images if you just know how to work with the strong sunlight. Have your light/sunlight cast over the front of the your subject so your digital image has evenly spread light on it, so no hard shadows or lines are created. This is precisely why digital photography can be enjoyable on cloudy days; because the light is evenly cast for us, making our jobs as digital photographers easier.

So make sure that when you are outside doing digital photography that the light is evenly spread over your subject and don’t be afraid of cloudy days. And don't worry about the sun; it’s all in the positioning of the light and avoiding hard light that is a fundamental key element to successful digital photography.

Cheers,
Amy

You can go to my website to learn more about digital photography. www.digitalphotographysuccess.com.

(Please copy and paste this url into your broswer. Blogger seems to be having trouble with links today.)

EzineArticles.com Platinum Author

The picture in this article is copyrighted to Amy Renfrey. If you want to use it, you must ask me first.

Wednesday, July 12, 2006

Why Some Digital Photography Images Work Really Well And Why Others Don't


Have you ever wondered what secrets professionals know about digital photography to make their digital photos look so good?

I used to find it really frustrating why some people seemed to posses a "look, point , shoot" process with their digital photography. What did they know that I didn't? How did they create digital photos, beautiful digital photos mind you, and for me it seemed really hard. And they never wanted to share any tips with me.

I can tell you one thing that’s so incredibly important with digital photography. And that's simple composition. At first my digital photos were too busy- they had things in the background that were distracting, over exposed and under exposed. There were some aspects of my digital photography that now, I would not even show you- the early photos were too bad.

Now of course going "pro" it’s a whole different story. I have to get it right otherwise I don't eat! It sounds dramatic but really when you are put under pressure you have to make sure your digital photos are right- in all aspects…..especially your composition.

Let’s imagine a professional photo of a landscape. You have seem them before so think back to the last time you saw a professional landscape photo and think what it was about the photograph that appealed to you.

I can tell you it was a series of things like light, lens, angle etc, but one main, important thing about it was probably the simplicity of the composition. Not too much in the photograph, things are in perspective with each other, the angles and lines compliment each other.

That's exactly what you need to aim for when doing your own digital photography. Keep what you are taking free of clutter, use good lines and angles and if necessary turn to the rule of thirds. All these things will enhance your digital photography and all make up your composition.
Simple composition is the most under estimated artistic influence in digital photography. You will find that the professional landscape picture has painfully simple composition as its fundamental artistic make up. And you can do the same. Keep it simple with your digital photography and you start to see amazing results.

Keep up the good work,
Amy Renfrey

www.digitalphotographysuccess.com

This picture copyrighted by Amy Renfrey.

www.digitalphotographysuccess.com


EzineArticles.com Platinum Author

Wednesday, July 05, 2006

A Digital Photography Tip- The Secret Of Clear Digital Images

Recently I’ve been getting a lot of questions about clarity. This leads me to the answers about lenses. You know if you do not have a good lens you do not have a good photo- generally.

The reason I say that professional SLR is much better than a prosumer camera or a point and shoot is not because of my desire to look “pro” when I take photos its because of the amount of control you have over the photo. You can control the light so much more; you can control the exposure and the general aspects of the image. And with this freedom comes the choice of getting the clarity via the lens.

To gain the ultimate freedom in picture clarity first of all you need to know what lens does what.


Fixed focal length lenses

A fixed focal length lens is a lens that is on most point and shoot and prosumer cameras. They are normally an average wide angle lens. It’s kind of like a “mid range quality” lens. If you then take a zoom lens and compare the two, a fixed focal lens is smaller and often has a larger max aperture. This is good, because they work pretty well in low light situations. These lenses appear clearer than zoom lenses. The only problem here is that your person or subject can appear smaller than you would like unless you move in closer.

Zoom Lenses

And what of a zoom lens? Without going into overly technical details, zoom lenses often have more practical focal lengths for digital photography. They can give you a good angle perspective for filling the frame for example. These lenses are great if you need to take shots closer when it’s impossible to get closer to something.

Optical zooms lenses are the best. My advice to you would be to forget digital zoom altogether. Digital zoom is not a real zoom, in other words it’s not a true representation of what’s there. You’ll just get more noise on your image which can’t really be edited.

The problem with zooms is that they loose light the closer you get. They have lower apertures and this can be difficult in low light conditions. In some situations it’s possible to use the flash and have adequate lighting, but other times you use the zoom because you are far away from the subject and the flash is only effective a few meters away.

There is no general answer to “What lens should I get?” The answer is it depends on what your camera can do and what you want to do yourself. But the more you understand what lenses do what, the better off you are of making an informed decision and get the right lense for the job.


Best wishes,

Amy Renfrey

www.digitalphotographysuccess.com

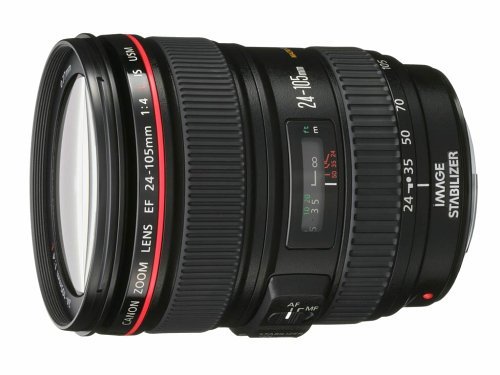
This photo is copyrighted to www.amazon.com


EzineArticles.com Platinum Author

Sunday, June 25, 2006

A Secret Way To Improve Your Digital Photography

I want to share something with you about digital photography.


Digital photography is an art form....this you know. But did you know what one of the secrets I use in my photography? And use this if you are stumped for ideas on how to take that all-important photograph.

That is this: Forget about photography altogether. Sometimes this will be the best thing you can do in digital photography is to forget you are taking a photo and just absorb the scene.

Okay I know I am sounding obscure... I'll explain.

Its easy to get caught up with all aspects of digital photography. So caught up in fact that you can forget how the heck to take that picture. You can experience 'brain overload' and not end up getting any good photographs at all. You try too hard.

You know what I did when I first started learning digital photography? Instead of trying to perfect the scene I forgot about it and just sat and looked at it. I let the beauty of the scene inspire me and quite my mind. I stop thinking for a minute and became absorbed in the moment of the scene.

I would just look and look and breathe out saying "oh wow, isn't that beautiful?"

Only then would I take the photo, not before. I would get into that meditative frame of mind and let THAT dictate my digital photographs.

You see my good friend, your ability in digital photography is not only the technical, its about the heart. It’s about letting the heart and mind come together, applying some sound techniques and creating art with that camera of yours.

Artistic first, technical second.

Don't be too caught up in what camera to buy etc. Really all you need is a damn good lens and a camera that will give you as many different exposures as possible. To take good, professional standard digital photos you need the lens first, then the camera controls after. The lens is king.
No good lens, no good photos. Its simple.

Just relax, and look at why you were drawn to the scene or subject in the first place. Then free your mind of what you "should" do, and then take a few shots. See what you come up with.

It will be a better digital photo if you free your mind of clutter and relax and focus on the artistic side first.

Best of luck,

Amy Renfrey

All pictures are copyrighted to Amy Renfrey. If you want to use them commercially, do the right thing and just go to my website and email me.

www.digitalphotographysuccess.com

To learn how to take beautiful digital landscape photos: www.beautifuloutdoorphotography.com


EzineArticles.com Platinum Author

Sunday, June 18, 2006

How To Take Sensational Photos Of Your Pets

How boring and uninteresting would life be without an animal to love? There have been studies done in the US about how having a pet reduces blood pressure, stress levels, increases all the other good hormones in our body. Lets face it, pets rock!

So how on earth do we photograph them? I'm not talking about snapping Fido any old way. I mean a classy digital photo where Fido looks exactly the way YOU see him...cute, loveable and gorgeous. The only way to take really great photos of pets is a few things. And take heed, because these things really work.

1. Take them at their eye level.

The problem I see ALL THE TIME with bad pet photos is that they are taking from your perspective, not at Fidos perspective. You see Fido from a height, and thats okay, but the trouble is that taking a shot with this angle doesn't give him the charm or appeal he really has in real life. If you got down on your hands and knees and took the photo from his angle, rather then yours, you'd seriously add a whole other dimension to the photo. Why? Because you are capturing his personality. And this is so important to do because people can't see his personality any other way in the photo other than getting suberb composition.

2. Turn the light on!

Too many times people ask me what they can do to improve their photo of Fido. I look at the picture and so often the pet snaps are quick ones inside. These are too dark and as a result you loose the beautiful personality Fido has and because of this perpetual "indoor snapping" people suffer from, you loose definition too.

3. Spontenaity is the key

Try to wait and have rock solid patience when you are taking your photograph of Fido. Don't take the photo when he is lying down like he always does. People won't ever get to know him through your photography, like you do. So perhaps you can take him outside, or to the park when there is a good amount of light and throw a ball to him and take a picture of him catching it. Or perhaps when he is running around madly outside, or even if you can, get him in a still moment. Or perhaps, if you wait long enough, he migt just look straight into the lens with those big, beautiful eyes that you love so very much and give you that photo you have always wanted. You know "that" ideal photo I mean. The one where people say "awww, isn't he beautiful." And they will finally see the side of Fido that you see; the beautiful pet that he is.

Now get going! Where was the lead and the ball again....


Best wishes,
Amy Renfrey


P.S This is Paddy, my beautiful cat. He's not actually about to eat anything, or attack anything, this is him yawning. Same cat, two different photos.

This picture is copyrighted to Amy Renfrey.

http://www.digitalphotographysuccess.com/


EzineArticles.com Basic Author

Taking Black and White Landscapes


Taking photos of landscapes in black and white can look superb, especially deserted landscapes, or with clouds. Rain clouds in black and white over a mountain would look fabulous. You will see this when you examine closely how nature looks in black and white. A great way to do this is to start looking at the shade of the blue in the sky and switch the mode to black and white; take this shot then take another in color. Compare the two and see how that shade of blue looks in black and white. This will give you an idea of how natural colour turn into black and white, from nature. This may also give you a photo which captures more of the intensity of being there, than colour can.

I don'’t see many landscape pictures done in black and white and IÂ’m not sure why this is because black and white softens a picture , and can have the same effect on your landscape shots. Many people prefer colour when taking nature shots, and this is fine, but I do urge you to experiment with this medium too. It just gives you another creative edge and a way to break outside our comfort zones as photographers and become a "photographic artist".

A great way to get out of this comfort zone and embrace black and white landscapes is to find your preferences while taking the shots. Compare a colour landscape photo to a black and white landscape photo and just see what feelings are generated. You will notice that you donÂ’t always loose something as our minds would have us believe, we can actually gain a new insight into this scene.

To start, take two shots, one in colour and one in black and white. This is the only way you really truly learn about black and whites beauty and get away from colour all the time. Vivid colour is definitely incredibly stimulating and beautiful but so is black and white. Colour invokes energy which is why we like it. However black and white invokes a sense of calm, gentleness and can even surreal feeling depending on the scene.

My last tip I can give you is that sometimes when taking black and white subjects, like landscapes, you may have to increase the exposure to give you a little more light in the photo. Black and white can make things darker because your camera lessens the effect of color light reflection from normal color photos. So just remember that might be the case with some black and white landscapes you are taking.

Best wishes,
Amy Renfrey

www.digitalphotographysuccess.com

If you want to know how to take powerful landscape photos just visit www.beautifuloutdoorphotography.com


EzineArticles.com Basic Author

Wednesday, June 07, 2006

Starting Black And White Photography


Photo ©Amy Renfrey www.digitalphotographysuccess.com

Have you ever noticed how some black and white photos just stand out? And when you go to try and take the same kind of photo it just doesn’t do the same thing?

There are a couple of starting pointers that I want to share with you about black and white photography with a digital camera. The first thing I can tell you is that to make a good black and white photo you must have good texture. Texture, or what something is made of, seems to be enhanced with grey scale.

Certain textures, such as natural textures seem to respond well in black and white. Black and white is all about capturing a sense of the dramatic, so if your subject has texture that is naturally dramatic, then you have the first step to a good b&w photo. Textures such as wood grain, stark metal, repeated patterns in nature such as waves or spirals seem to work well in black and white.

With black and white, try to keep some symmetry in your texture. Its easier to create stunning black and white photos when you have symmetry in your texture because it can sometimes be lost in color. Symmetrical textures in black and white are consistently beautiful and offer something the eye cannot capture as well when working in color.

Grey scale is not just the absence of color, or everything taken in shades of grey. To understand and master black and white photography with your digital you must understand the concept of grey scale.

Grey scale is a spectrum of black, lots of grey and white, like the colours of a rainbow but in a series of black and white and grey tones. You see a black and white photo is not really only black and white; it is actually lots of different shades and different depths of grey. So when we talk about grey scale it just means the way we measure tones of grey. Included in the grey scale is of course black and white.

This sounds odd to say, but when finding what looks good in black and white you can start with high contrasting colors in your every day subjects at home. Stark colours such as red, deep purples and bright yellows can make a really good starting point. With bold colours such as these, your camera will interpret them differently. It’s almost as if the camera leaves out what the eye distinguishes as that particular color and keeps the intensity there. I won’t go into the technical jargon now, but for now, just try experimenting on those colors. If you can’t find these colors around your home, try going out into the garden and taking flowers that have these colors, or go to a nursery, plant store or public gardens.

You see black and white is not just ‘no colour’. Its so much more, so much deeper then that. The purpose of black and white nowadays (as opposed to when it was the standard and people had no choice) is that it creates a sense of stillness in time, and with the right perspective, a great story.

Best wishes,
Amy Renfrey
www.digitalphotographysuccess.com
www.beautifuloutdoorphotography.com


EzineArticles.com Basic Author

Tuesday, February 14, 2006

How To Photograph Interesting Little Creatures- Yes, You Will Get Dirty!


I can’t remember a time when I wasn’t fascinated by animals. And not only the cute fluffy or furry ones that meow or bark, but ones on the ground that we don’t see very often. There’s nothing more fascinating than those little beings like grasshoppers, butterflies, baby birds, ants, beetles and bees.

This picture of this caterpillar coming out of its cocoon to become a butterfly was seen by accident. Call it sixth sense, call it just being obsessed by any photo opportunity, but I saw it.

I was doing ‘clean up’ on my computer a week ago. As I waited for the computer to do it’s ‘thing’, I looked outside and saw something moving slowly along the brick pavement. I could not see what it was so I wandered outside to get abetter look.

There he was. This little guy was struggling to come out of his cocoon that held him snugly for all those months and now he was emerging to greet the world. I couldn’t believe what fortune I had as far as a photographic opportunity had come my way. (That just seems to happen with me for some weird reason.)

I rushed back inside and grabbed my camera, my macro lenses and prayed to God I had a memory stick in the camera. I turned the camera on and it said I had memory available. Thank you God! I then leaned down and took a couple of shots, trying not to scare him away or back into his cocoon.

I got so close I accidentally breathed on him and that’s what he did. Pop! He was back in there faster than anything.

So I had to wait for about 5 minutes before he stuck his head out and continued his journey again. He dragged that thing around the back garden for about half an hour, not being able to free himself of it. The patience and persistence in this little guy was amazing.

Now, okay, he’s not going to win any awards for being the best looking creature in “Amy’s garden”, in fact he's really ugly, but he would win first prize for perseverance.

You will find that a lot of creatures like this, photographed up close look like something out of a horror movie, but really they’re not bad at all. (Except spiders, now they're downright evil and any one that likes to photographh them should see a shrink.) Caterpillers and other little creatures actually don’t care about us at all which gives us supreme photographic advantage. They don’t put their paws, wings, feelers over their faces saying “oh god, don’t take my picture, my hair isn't right!”

This amazing guy was taken at first with no macro lens and the photo did not offer me any detail close up. When I applied the marc lenses I used 3 of them which magnified him x7. But the only problem was that because he was moving, he was out of focus many times.

So there I was, laying flat on my stomach following this guy around the garden for 15 minutes determined to get the “right” shot of him. So I got these ones.

I felt I was really lucky because it was an overcast day. And as you know overcast days create filtered light which is perfect for photography.

When using macro lenses you do have to be careful of two main things. The first is that they have an incredibly short depth of field. This is why I had to be fast up close with this little guy or I’d he’d drag him and his cocoon out of the focal point.

The second is that the closer you get to something the more you loose light. You see when something is small, or has a very small area, there won’t be as much light on it as there would if this subject was large.

I took roughly 25 shots of him and came out with about 5 good ones. I wished he could have stayed still for me!

So remember if you see something like this, don’t miss it because it might not happen again.

Amy Renfrey
www.digitalphotographysuccess.com


EzineArticles.com Basic Author

Thursday, January 26, 2006

How Much Is A Good Photo Worth To Your Safety?

Boy, it’s been so darn hot where I live in the southern part of Australia (Victoria) , its so hard to concentrate on work! Forget the camera and taking photos, I can't even go outside its too hot. Just gimme air conditioning and ice cream! No actually, just let me lie in a bath of ice cubes....that might cool me down.

Am I exagerating? The other week is was 43.8 C which is the hottest day on record since the 1880's. (Thats around 106-110F.) And 43.8 C bouncing off city concrete roads, pavements, brick houses and tin sheds just isn't funny. Its too hot even if you're a "Summer person" like I am.

Fires, or "bushfires" as we call them in Australia, really freaks us Aussies out. The trouble with heat in Australia is that is causes these uncontrollable bushfires in so many country regions. (That’s what happens when you get a couple of 40 degree Celsius days on a row-that’s about 106 F with hot, dry winds). I don't mean just little fires, I mean raging monsters that burn peoples houses down, burn animals alive, ruin crops, whipe businesses out of existance and destroy everything in its path for miles and miles.

Its not just Victoria that gets nasty monsters like this. Its NSW (the state where Sydney is) and those poor guys suffer just as much as country Victoria does.

Right now, there are 600 heroic Fire-fighters trying to control a 300 km fire in Victoria. These amazing guys work day and night to the point of exhaustion. These guys sometimes loose their lives. Can you imagine how tough that would be for the families?

And the temp doesn't go back to a nice 28 degress (85 F), it stays up at 33C, 35C, etc. That means it goes from about 106F to about 95Fand doesn't give us any releif. Then more fires start. Sometimes by sick people who think its funny, and most by natural heat combustion and increases in the bushland areas.

Before things got out of control in a small region of my state, Mick Davson, a nice young chap from the country has sent me photos of his work. He actually managed to capture some images of a fire raging near our city. As it turns out he wasn't supposed to get that close, (he didn't know at the time) but the shots were amazing. You can't help but look at them with sadness and awe. (Sadness at the destruction, awe at the how powerful nature can be.)

(They are all his work, which means they are copyrighted, so if you want to use them you must ask him first. Contact me and I will email him your email to discuss any commercial ventures. Thank you for respecting his wishes.)

If you have the opportunity to photograph something like a fire, a storm or something that has potential safety issues then please, be wise. Do what Mick did and stand a safe distance a way, take your photo and leave. I know some photography nuts (like me) will do almost anything to get a good shot but don't be crazy about it. If your safety is at risk forget the photo. You can't take pictures if you are injured, or worse.

Do what Mick did and be sensible. With fire especially its not only the flames that hurt you, its radiant heat and falling embers. I should know, my mother lives near these fire stricken areas. She's okay, but does give me the "update" most days at the moment. Its me that worries about her!

I emailed Mick and asked him if I could add these pictures in the blog to share with you. The photos are such a good capture of what parts of our state look like from a non-media persons perspective. A big thanks to Mick, for letting me share his work.

And to answer the question; "How Much Is A Good Photo Worth To Your Safety?" The answer is "it isn't". Your safety is the most paramount thing. Good on you Mick for being smart AND getting some good pictures.

Mick took these pictures at Victoria's east. Anakie, near Geelong. If you want to see a picture from the media here in Victoria then have a look at the photo at the bottom. It was taken from http://newsimg.bbc.co.uk. And for the real story and more excellent photos go to;
http://www.heraldsun.news.com.au. (It's our city papers website.)

Cheers,
Amy


Saturday, January 07, 2006

Fast Actions Shots In Low Light

You know recently I have been getting a few requests to please help with fast action shots indoors. I remember when I too was frustrated with not being able to get a response from professional photographers about this situation. They were always so elusive with how they conducted themselves out on the field and what they did to get a certain effect.


So now I'm going to tell you about how to master this. Do you want the good news or the bad news first?

Okay good news is that yes it is possible. Bad news is that you do need a good camera with manual controls to do it. Now since you have already bought the ebook I am assuming that you have either a point and shoot camera or an slr. Either way, its better than a cheap camera that does nothing.

Okay good, so we got that established.

The secret is this: the reason fast action shots look blurry is normally because they are taken in level of low light, such as an indoor basketball stadium for example. What happens is the camera, if left on auto, automatically adjusts itself to low light levels, which means a slower shutter speed. A slower shutter speed occurs the camera needs time to get in as much light as possible due to this low level of light. Its great from the cameras point of view, but really, its annoying and disappointing.

So what can be done about it?

Well firstly, increase that shutter speed. You may notice an increase in digital noise but it will only be slight so don't worry about it. After all its probably worth it for that 'golden' photo you are trying to get.

Its going to be hard getting more light into the camera, because usually you'll be too far away for the flash to work appropriately anyway. This is why your shutter is the first consideration.

Something that might help further is this: Shot 1- take the shutter at a certain speed, shot 2- increase the shutter speed one notch, shot 3 then increase it again, and so on and so forth. If you have the patience and inclination, write down on a note pad exactly what shutter speed shot 1 was at, what shot 2 was at, etc. Then when you view the images on your computer later that night you will have the settings writing down so you know what shutter speed worked the best. Then you can apply that to other situations too.

So relax and work with what you've got. Increase the shutter speed or increase the light.

Best,
Amy

Picture courtesy of vb.game-host.com

Thursday, January 05, 2006

Tuesday, September 06, 2005

A Tribute To New Orleans

No doubt no you've heard of the tradgic loss that New Orleans has suffered over the past week. Many people have lost homes, families, friends, and everything they own. To honour New Orleans as a wonderfully diverse city that it was- and will be again one day- I would like to share my photos of New Orleans taken a few years ago. Please post your pictures in here to, to honour the people of this wonderful city.

I have some black and white traditional shots (yes with film, remember film?) and I will get them transfered into digital images for posting up on this blog.

I think it is important to do this because we don't know whenNew Orleans will be the same fun loving city that it was- not for a while any way. So keep the people in your hearts and prayers and put your pictures up as a tribute to them and the place they call home.

Keep smiling,
Amy

Sunday, August 21, 2005

The Problem With Travel Photography


Hi lovely people,

I spoke not long ago about travel photography. I'd like to discuss a particulary problem with travel photography, and it's not with the camera, its with us.

One thing that you might notice whilst travelling is the lighting differences between the place you are visting and home. Your digital camera 'light settings' will still be set to where you came from, not where you are when you are travelling to.

Recently I went London and discovered something very important. I had my trusty Sony set to an E/V of 1.0+. This really means, in English, that I had the eye of the camera adjusted to reduce some light because light here in Australia is so bright. I realised what a bright environment we live in down under when I went overseas. In a nutshell I had my camera set to Australian 'light settings', not UK 'light settings.' Its not really called a 'light setting', but I'll use that term for the purpose of simplicity.

(You need sunglasses every time you go outside, where I live, even in the winter. Complaining? Not a chance! I do love the light in this country.)

When I got to London I looked at the veiwfinder and everything looked really dark. I was confused at first but had a theory. So I took a few test shots to try out my theory. I was right I had the camera on the wrong setting for London light. My first test shots I focused the camera at the brightest part of the object I was taking and took the shot. As a result my pictures came out either too bright or too dark.

"Excellent!" I said to myself at Trafalgar Square, "That's right then." In my Aussie accent- which I didn't think I had an accent by the way! (Just kidding.)

I then took the E/V up to 1.7+ and got the right shots. I got the right shots because I adjusted the amount of light that was coming into the camra. And to me, coming from such a bright place and going to London to me, seemed a darker place generally. Not bright, glary light like Melbourne. However this light is fanatstic for digital photography if you have filtered light like this. In Australia we are costantly ranting "the polariser! the polariser!" But in London, at times, I could get away with not having it on the camera at all.

So please remember the first thing you do with that digital when you are travelling is to look at what you have the camera set to to accept new lighting conditions . You may need to adjust the apeture if you are going from one continent and one season to another. Each season has a differnt light and varies from country to country.

Have a great day.

Amy Renfrey
www.digitalphotographysucess.com

Wednesday, August 17, 2005


Denis, You must be Austalian, you're using my language! I'm very pleased you like the ebook. And thank you Marguerite for adding your lovely feedback too, I'm very glad you like it as well. I spend a few months writing the book and refused to release it until I was certain I had everything in it. But please, if there is something, anything at all, please leave a message here on the blog and I'll answer your question.

I'm always learning. I think its important to see your photography this way to retain a sense of excitment and stimulation about it. And really the best thing you can do in your photography is be as creative as you like. And this will give you confidence with it and a direction you can follow.

My cat here, who is now a celebrity (I'm positive she knows it) because of the eBook is another thing that maks photography worthwile. I swear out of the corner of my eye I see her roll her eyes when I whip out the camera again- then when I look she is looking so innocent.

Oh and one more thing, I'm investigation what the Nikon D50's are like. I'm doing a bit of research and nutting out somethings about it. So I will let you know what I find. Getting a great camera is worth while as long as you don't have to mortgage your house to do it!

I'm just putting the finishing touches on the black and white photography ebook. So if you are interested in B&W then 1) don't use my picture of the church as an example and 2) let me know and I'll put you on my special Black & White VIP list and you'll get it for a special price.

The website will be up soon for you to look at. It's not quite ready yet!

Amy

Thursday, August 11, 2005

Thanks Everyone


Thanks everyone for adding your pictures and contributing.

Since Gary has taken some good travel pics, over the next few weeks why don't we add our travel pictures? I know that everyone has been away at some stage and it would be good to share them and comment on them.

Okay here goes......

This was taken in Christchurch New Zealand on my recent travels in June 2005. This place is called "Cathedral Square." On my camera I set the E/V at 1.3 and shot in B&W. I've got a real thing for B&W, especailly Churches in B&W.

I am not sure if I need to crop the bottom slightly for composition, what do you think?

Amy

Monday, August 08, 2005

Adding Pictures


Okay I'm now seeing if adding this picture works....... I'll just grab anyone to try it.

tesing, fingers crossed.....

Hey it worked. Gary, you are a legend! I didn't say it'd be a GOOD photo! This ones' overexposed, but at least I know we can all add photos in here!

Cheers,

Amy :)

Monday, August 01, 2005

A Very Warm Welcome!

Hello Photographic Enthusiasts!

Thank you for stopping by. It's lovely to have you here.

I thought I would start a blog and put some great articles in for you to read for no charge, on how to improve your digital photography in easy ways.

I've got some great stuff I'm going to post in here such as:

Getting better indoor shots
Taking that perfect picture of your pet (good if you are as in love with your animals as I am!)
Handy ideas for digital printing
Editing digital photos

....and a lot more!

I'd love to hear your thoughts on what you want to know about, so please leave me a post and also get to know your fellow photographers. Also if you've got some cool tips you have found that work well, please share them. You are very welcome.

And yes, please, post your pictures for me to review, for others and myself to enjoy or for some positive improvement feedback. I'll also be putting some pictures in here of my recent travels to Hong Kong, London and New Zealand in the next few weeks.

I'll also be doing another eBook on Travel Photography in the next month or two, keep your eyes out for that one! Also I'll be bringing out an eBook on Flower Photography, Black and White Photography For Enthusiasts and People Photography. All on digital of course.

I've developed a series of digital images called "The World Up Close." It'll have abstract, black and white, colour, sepia shots and much more. (I could have titled it the "What The Hell IS that?" Series, but I thought I'd better be professional.......After all we're artists, don't let anyone tell you otherwise! :) And who says we can't have a sense of humour with our photography?)

And please post some pictures for everyone to see. So that you can share your photos with the world, or just other digital photography enthusiasts. By the way ALL photos posted in this blog are copied righted to the artist who took them. And be honest, if you see a picture you like, just email and ask to use it. Always get permission first.

Enjoy and be creative!

Have a great day,

Amy Renfrey :)

Thursday, November 24, 2005

Welcome To 'No More Bad Photos'!


If you've ever been dissapointed with your photos in the past, then this is the blog for you. Every week I'll be updating this blog with handy tips and tricks to get your photos looking great, and the way you want them.

I'll be honest with you, I'm a no non-sense kind of person. I tell it how it is and you can ask me anything.

In a couple of days I will start giving you some great tips to change those photos from crappy to brilliant....

Oh yes, I won't tell you that you have to buy hundreds of dollars of camera crap to get good shots. All you need is an elcheapo digital camera and a pair of sunglasses.

Cheers! :)