Tuesday, January 23, 2007

Winter Colour And Digital Photography


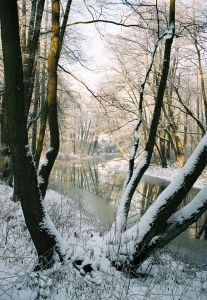
Winter and colour in digital photography is one of the most beautiful aspects about digital photography. The light that winter offers us provides a great relief from the harsh, unforgiving sunlight causes hard shadows for our digital photography. We can loose detail and definition during the summer months whilst partaking in digital photography, and can be very disappointing.

One great thing about winter light and digital photography is that the scene you are working with often shows you colour that isn’t seen as easily in hard light. The way it works is that the filtered effect of winter light helps us see the other colours that otherwise get lost in the warmer summer months.

The soft pale greens and pastel yellows in a digital photography scene can become lost in the overexposed contract of the outdoor summer sun. With digital photography in winter, those pastel yellows and pale greens become soft shades of a bigger colour, providing a great opportunity to show themselves as a more true and real presence on your digital photo.

And don’t forget about black and white photography during winter. An already black and white scene can make tremendous black and white photos in digital photography. Black and whites of subjects that are already black and white prove to have more of a contrasting effect. If you take this effect with soft winter light you will often find that your black and white digital photos retain some dramatic qualities about them.

Just remember though, when you are metering for black and white during winter time on the auto setting, your camera will want to underexpose the black areas and overexpose the whites. Just find a medium shade of grey in your scene and meter off that, providing you with some mid ground for exposure. This will work from a focus point of view if you are shooting some distance away.

I hope you are thinking of winter now with a new perspective. It’s a beautiful time for light and the filtered effect can bring otherwise pale colours out into the open making them appear more colorful. Black and white photography during winter can also provide some dramatic images as well. Work with this beautiful light.

Amy Renfrey

www.DigitalPhotographySuccess.com


Wednesday, January 17, 2007

Digital Photography During Winter


On many occasions during my time teaching digital photography I’ve had people say to me “oh, its winter, I can’t possibly take beautiful digital photos now.”

If you’ve said something like this about winter digital photography then just wait for this…

Did you know that digital photography during winter is one of the most fulfilling creative practices you can do? Digital photography is not just about summer; colour and bright sun shine….its much, much more than that. So here are some powerful digital photography tips for winter.

Firstly you can create some pretty sensational black and white digital photos during winter. If you live in a place that goes grey for the whole time winter is around, then consider this digital photography tip; maximise the absence of colour in your digital photography. You can create some very dramatic black and white digital photos of stormy skies, rain clouds; sheets of rain against darker objects making the rain look white in colour.

You can also try getting the most out of the blues, whites and blacks in your winter digital photography. Lets take for example a beautiful snow scene with a blue sky. You have all the softness of the gentle white snow blanketing your landscape or parkland. Along side this beautiful feeling you also have the stark black trunks of the trees, whether thick or thin. Then, to add to your digital photography experience, you may have the gentleness of an animal or the backdrop of a lake.

You see, what winter does for digital photography is feminise it. It takes away the masculine energy and replaces it with a quite, calm introverted feeling. Winter digital photography can offer you a soft light, which can provide beautifully filtered light in your daytime subjects.

When you partake in digital photography in the winter time the first thing you will notice is the light. Winter changes not only the physical temperature, but the temperature of light changes. There is less hard light and more bluish tones on your scene. It’s absolutely beautiful if, and only if, you maximise this to its full extent.

So just go and look. Look outside and notice how much beauty you see all around you. Look at the shades in your environment and see how much you can capture of this gentle bluish light.
It’s really divine.


The Awesome Power Of Lightening Combined With Digital Photography


Have you ever noticed that in digital photography there always seems to be photos of fork lightening that some clever photography enthusiast has mastered? The fact is that digital photography is a challenge and as soon as we develop the interest in digital photography we are challenging ourselves from the start. And a real challenge in digital photography is fast moving subjects. And when it comes to either traditional or digital photography catching electrifying fork lightening just is too much of a enticement to see if we can “win” the challenge.

So how do we apply our digital photography to sharp, brilliant streaks of colour over our images?

Getting great shots of forked lightening is not as difficult as you would think, or have been led to believe.

As a digital photography teacher I can honestly say that the first thing people do it buy way to much equipment for this exercise. You really just need a few simple things. A camera and a tripod are the main things.

The main challenge in digital photography when taking lightening shots is where to position yourself. I’ve had many a frustrating time, in the early days of my photography, trying to get the best angle, the best position only to find I had the camera pointed at completely the wrong part of the sky. And some of my digital photography lightening exposures were all wrong. I was thinking it was as hard as trying to predict a horse race with a crystal ball until I worked out the logic of it all and it started to become a lot of fun.

The first thing to keep in mind is to make sure your shutter is open. Lightening is sharp, short and sweet. Its important to get the most out of the long, open shutter speed by leaving it open for a long time. You can do this with confidence on a really black night such as being in the country on a dark night without any city lights or too many clouds around for the light to bounce off. In the country you may have the freedom to leave the shutter open for as long as 60 seconds.

However in the city it’s a bit different. What tends to happen is that due to other light in the atmosphere, light from buildings, streets and cars you can see this scene turns out much brighter on a 60 second shutter speed.

A quick way to get great lightening shots is to find a good place to set up where you know lightening is either happening or is about to happen. Take your tripod, camera and shutter release cable. The great thing about a shutter release cable is that once the lightening has struck there is no need to keep the shutter open and you can simply press it the shutter will close.

Try setting your aperture to about an f 8 or so and leaving the shutter open from anywhere between 10 seconds to 60 seconds. (Setting B). Set your IS0 at 100, set the focus to infinity and wait.

Digital Photography Safety

It’s a good idea, any time in digital photography, not to jeopardize your safety. Digital photography is intensely fun and incredibly educational and creative, but it’s not worth risking your life for. As much as it’s a beautiful spectacle, its much more wise to stay well away from lightening. It’s carrying enough energy to give your house power for two months solid, so be careful!

By Amy Renfrey

Picture copyrighted by James Stratton.

EzineArticles.com Platinum Author